If your office uses patient alerts then you are probably familiar with the pop-up messages that go along with them. But do you really read the pop-ups or do you just click OK to get rid of them so you can get on with the task at hand? If you feel that these alerts are more of a nuisance than an informative tool, then this tips and tricks article is meant for you.
Today’s tip will help you set up pop-up alerts that are more effective. The key is setting them up to only appear when they are relevant and necessary. Follow the steps below to find insights about key settings that will make this feature more effective in your office.
- In the Patients module, select the patient for whom you want to make an alert.
- Click the Alerts button.
A white bell icon indicates the patient currently does not have a patient alert set. A red bell icon indicates there is a current alert for the patient. This icon appears under the File tab in the Patient module and in the Patient banner.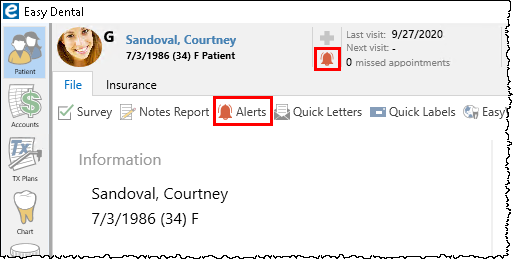
- Under Select Date, enter the desired Start and End dates* or select Always to permanently activate the alert.
Note: If the alert is going to be relevant for only three weeks, enter a start and end date so that the alert stops appearing when the information is outdated!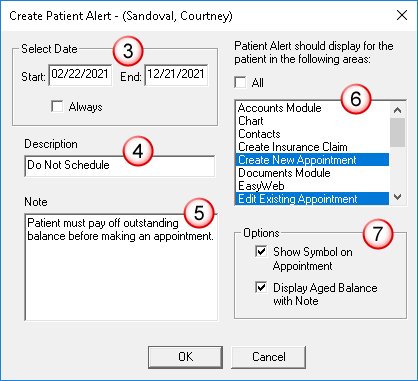
- Enter a Description for the alert (for example, Collections or Pre-medicate).
- In the Note field, enter a detailed description for the alert.
Note: Be sure to include enough information to make the reason for the alert clear to anyone who reads it. - In the scroll pane, select the areas of Easy Dental in which you want the alert to appear.
Note: This is the most important thing to consider when creating alerts—and the most often misused. Think about the alert you are creating and in what areas of Easy Dental this alert is relevant. For example, if your alert directs staff to not schedule an appointment for John Doe until his outstanding balance is paid off, then you should only set the alert to appear when scheduling tasks Create New Appointment or Edit Existing Appointment. This alert is not relevant at any other time. Think about the tasks listed in the scroll pane and only select the ones that directly pertain to the alert you are creating. - Under Options:
a) Select Show Symbol on Appointment to display a flag on the face of the appointment.
b) Select Display Aged Balance with Note to display the patient’s balance at the bottom of the patient alert pop-up.
Note: If you are setting up the alert for a financial reason, such as the need to collect at time of service, select this option so you can see what the balance on the account is at a glance without having to switch to another module. - Click OK to return to the Patients module.
Patient alerts are meant to alert your office to certain situations concerning your patients. If you aren’t reading them because they pop up too often or unnecessarily, they are ineffective. Make patient alerts effectively work for your office by setting them up and editing those that are currently in use according to the steps given above.
For more information, refer to the following topics in the Easy Dental Help:


